If I remember correctly (and I do because I've just re-read it) then we were discussing your steps and how they change level.
Any level change in your garden needs recording whether it's steps or slopes. Measuring them isn't actually that bad, so there's no need to panic just yet! If the incline is particularly complicated then it may be worthwhile hiring a professional surveyor. If you're willing to give it a go though then well done you.
The key to getting this bit right (and in fact any other bit) is to work methodically and accurately. If you haven't used your assistant up to now, then it may be a good time to ask them to put down their cup of tea and come and help you. There are different methods for measuring levels, but whichever method you choose you must make a record of not only the change in level of a certain distance, but also make a record of the actual distance you are measuring. Plot the points that you are recording on to your survey plan. If you fail to do this and later cannot locate the points then it will have been a complete waste of time and you still won't know your level changes for your plan.
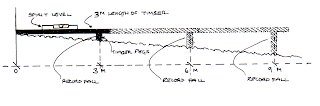
The most common method of measuring level changes is to use a straight piece of timber and a spirit level. You will also need shorter wooden pegs. Aim for your piece of timber to be 3 metres long if you have an average sized garden. Starting at the highest point, place your long piece of timber (i'm going to call it Woody from now on because it will be quicker to type) onto the ground. Support Woody with a wooden peg at the lower end. Sit your spirit level on top of Woody to make sure it's straight. Then, when you're happy that Woody is level, measure the distance from the bottom edge of Woody to the ground. This will tell you what the fall of the land is over a 3 metre period. Needless to say if you can't fit a 3 metre "Woody" equivalent into your space then use a shorter piece, allowing for this in your calculations. You can repeat this procedure over a longer length by moving Woody along each time (see diagram).
If you are unable to obtain a 3 metre piece of timber named Woody (name optional), then you can carry out the same procedure using a 3 metre length of string. This method isopen to more error though as you must remember to keep the string taut at all times.
Another method of measuring changes in ground level is by using optical measuring equipment. This equipment is really useful in much larger gardens and is usually available to buy or hire. As we are looking to save money by designing our gardens ourselves though, I won't go into detail about this method.
Another method of measuring changes in ground level is by using optical measuring equipment. This equipment is really useful in much larger gardens and is usually available to buy or hire. As we are looking to save money by designing our gardens ourselves though, I won't go into detail about this method.
Whatever method you eventually opt for you will need to establish a datum point onto your survey plan. The purpose of a datum point is to allow you to have a fixed point that all subsequent measurements can be related back to. Where you decide to position your datum point is not crucial although it would be easier for you if you pick somewhere that is accessible. often the datum point is positioned close to the house or in a piece of ground that is going to remain at the same level when the design is completed.
At a risk of confusing you even more, the datum point, once you have chosen it's position will be known as your 'zero level point'. All recorded heights will then either be higher (+) or lower (-) than your datum point (zero level point).
At your chosen datum point position on the survey write "0:00". If your next level measured is, say, 70cm lower than the datum point, it would be written as "-0:70" or if the level recorded was 30cm higher than the datum point, then you would write "+0:30". Get it?
And that's all there is to it! Easy huh? You can have another cup of tea now and then we'll get the camera out!
Refreshed? Good. This next bit of the site survey is the easiest of all. This is the bit when you can be like David Bailey (or any other photographer you admire) and snap away to your hearts content.
"Why do I need to take photos when I can just look out of the window?"
Photographs provide an excellent record of the site and you can use them to create underlays for any sketches of designs (brilliant if you're not picasso!). The best way to capture the whole garden is to take a composite photograph. This involves you standing in one spot and rotating 360* taking a series of photos that overlap each other. When you have your photos you can piece them together like a jig saw. If you have a posh photo editing programme you may be able to piece together the photos on the computer, and then print out the finished composite photograph. Whichever way you chose, the proportions of the garden will get extremely distorted, and you will need to remember this when you use them as underlays for sketches.
What are you like at drawing? You may find it helpful to draw or sketch a particular scene or feature in the garden that you want to capture. By sketching it you will become more familiar with it as you're having to actually study it, and not just click a camera at it.
Once you've got your photos, have a mess around with them. Enlarge or reduce the images and make photocopies of them. Grab some tracing paper and put it on top of your photos as an overlay. Try sketching new ideas on top of them. They don't have to be masterpieces. It's just an opportunity to start experimenting.


No comments:
Post a Comment