Showing posts with label drawing. Show all posts

Monday, 18 August 2008

How to form Shapes and Patterns in your Garden Design

Time to learn more about how to design your perfect garden.

You have now completed you functional layout plan and taken into consideration the principles of design that I covered last week. (Check my archives for this information)

Now, you need to begin the

design layout!

Don't worry, as before, we'll take it one step at a time and look at tips to make the process easier. It would not work well to just draw any old shapes and patterns on to your design and hope for the best! You have to decide the best logical decisions to ensure that your plan will look good. This can be made easier by using tools such as geometry and grids to assist us.

The most important thing to remember is that designing your garden isn't about drawing pretty patterns. You are, after all, a designer, and not a decorator! Having said that though, there is a place for patterns in your plan as they can help to form an intrinsic part of the design. Totally confused? Patterns can create mood, direct movement, and even help to alter the perceptions of the space.

You need to decide which shapes are going to form your design and how you are going to compose. You don't need to pluck these shapes from thin air. Refer back to all of the information that you have collated so far and search for clues. If your design brief stated that the garden would be formal then this would suggest using solid shapes such as squares and rectangles. They would also need to be set out in a symmetrical pattern to emphasise the formal theme. On your functional layout plan, you have already decided where some of your shapes need to be located within the space and so use these as your guide. You may need to juggle a few shapes to permit them to sit better in your design. This is normal and shows that you are allowing the design to change and develop as your thoughts and ideas become clearer.

Not certain that your shapes and patterns look right in your plan? Not a problem. Think back to your principles of garden design: unity and harmony, scale and proportion, and balance. These principles should be applied to the process of positioning shapes and patterns. Try to relax and let your sense of imagination have a slightly higher say than sensibility. You don't have to get it right first time. Just keep experimenting until you get something you feel happy with.

Okay, so you've looked through all of your work so far and you've still no idea what direction to take your design in and indeed no idea what blimin' "shapes" to use! Take a step back from your garden design and think more about the composition of shapes in general. Get yourself some fresh paper and draw the outline to your garden on to it. Then, draw yourself some different sized shapes on separate paper and cut these out. Now, within your garden boundaries, place your shapes in different ways and see what looks good to you. This could help you to reach some decisions about your design.

Consider each shape individually and then look at how the shapes relate to each other. You will need to analyse each shape to fully understand how it can be used to most effect within your garden.

The Circle is a strong. formal and simple shape that occurs in nature. It has symbolic meanings in many religions and cultures, such as in China where it represents heaven and forms the basis of the Tai Chi symbol of Yin and Yang.

The circle is made up of a centre, a circumference, a radius and a diameter. We can also extend the radius out from the centre of the circle, beyond its circumference. A tangent can be created by placing a line outside the circle that touches the circumference and forms a right angle with the radius line. (See diagram) To join any shapes to a circle it is important to link these new shapes with one of the lines we have identified. If you do not use these lines then the design will look unbalanced and awkward.

The Square is also a formal shape. It is a man-made shape with rigid sides and axes that pass through it. It is composed of a centre, sides, axes and a diagonal. Lines from the sides and axes can be extended beyond the outline of the shape to help formulate and create adjacent shapes. The axes can be used to divide the square into smaller squares or rectangles. A rectangle can be formed by extending one side of the square.

Similar shapes are relatively easy to combine as they generally fit together fairly easily. if you want to combine different shapes, then just remember to join them using their different component lines and they should fit together in a more pleasing composition.

When combining shapes prevent yourself from placing them in such a composition that you create acute angles (less than 45*). This will be very difficult to actually landscape and will look weak . Creating acute angles normally arises when combining circles to other shapes. Whichever shapes you are combining they will need to differ in size to establish a dominant shape. If you fail to do this then the design will lack identity, be dull, and lack focus - sorry!

Circles can be combined in many different ways such as overlapping them or in concentric circles. When overlapping them it is best to make sure the centre of the overlapping circles passes through the circumference of the underlying circle. If there is too little overlap then you could be creating an acute or obtuse angle which may be difficult to deal with, and, once again, will not look right.

Have an experiment with a pair of compasses and see what you can do with circles. Try expanding the radius out of the original circle and drawing a new circumference so that you create a wedge. You can also try drawing circles with in circles and creating the appearance of a cut tree trunk.

Have fun and get to know your shapes!

Time to get a bit more technical with the whole shape thing. You can create a shape using a curvilinear design. A curvilinear design uses the the circumference of circles and ellipses to form the design. Try not to confuse this with natural and free-flowing designs, where you purely draw a shape with your hand and do not use other shapes to create it. To successfully create a curvilinear design, you will need to combine circles so that they are tangent to each other - the fewer, larger circles you use, the simpler and stronger the curvilinear design will be. Curvilinear designs work best in informal garden settings. Take a look at the diagram. You can see how the circumferences of the circles create the curvilinear design.

To combine rectangles is a fairly easy process and you can usually achieve pleasing results without much effort. They are useful for creating formal, symmetrical and asymmetrical designs. Consequently, they are used to link architecture with gardens and are often placed close to the house or building to create patios and terraces. Rectangular shapes do not work so well for informal designs.

To combine them, as with all shapes, use rectangles of different sizes. Try to keep the shapes fairly large and restrict the number used to prevent the design becoming messy and cluttered. There will need to be a hierarchy of sizes, preferably with one larger, dominant rectangle that is surrounded or overlapped by smaller ones. This theme works particularly well in long, narrow gardens.

You can develop the rectangular theme by laying then at angles to the house and creating diagonal themes. if a site is very short and small, using a rectangle at 45* to the house can can take away the emphasis from the closeness of the rear boundary to the house by directing the eye towards its longest axis.

When designing shape combinations it is important not to get too carried away - remember keep it simple.

Okay, so you've got your shapes but how do you position them into your plan? There is a method using grid-lines that can help you to position your shapes and make sure that your shapes are in proportion to the building or house.

The grid system works by taking a measurement from a feature on the house and using this dimension to create a grid square - this grid is then repeated to fill the site. The feature that you use to determine the size of the grid square should be located on your baseline or house facade so that it visually connects and relates to the garden. The theory is that the designer (you) can use this dimension to draw up a grid for use as an underlay, onto which you can then arrange the patterns and shapes that will form the design. The measurements used for the grid will have a direct relationship with the house, and resulting patterns should also therefore be in proportion to the house.

Take a look at this next diagram. The unit of measurement for the grid square has been taken from the french windows. The shaded squares show how you can use the grid to create shapes and patterns for your design. Easy, hey?

The grid-lines don't always work for every designer but have an experiment anyway and see if it works for you. You can also try scaling your grid squares up or down proportionately or, when you feel confident with the method, even rotating the grid 45* to the house.

Whether you decide to use the grid or not, try to link lines from the house or baseline to shapes in your design. This will continue to create a direct relationship with the house and the garden. If there are existing features within the garden that are to remain then these should also link to the new design in a similar way.

Once you have created some interesting shapes for your garden, experiment with them by tracing the overall outline that your shapes have made and considering how they look. It must be a shape that is possible to create in real life.

Remember, I mentioned freehand curves earlier? If you want to create a natural look to your design it is possible to draw curves and shapes freehand although it is somewhat harder. You will have difficulty reproducing your shapes and will have to use the offset method of measuring to ensure accuracy. If you create a garden using this freehand method, then you must make sure that the shapes are bold, natural and not forced. Give me geometrics any day!

When you have got to a stage where you're happy to combine your functional layout plan with your new design layout, use smaller, scaled-down, versions of your site outline and roughly sketch in your proposed design layout. By drawing these rougher sketches it will be less intimidating than drawing onto your larger plan and will hopefully allow you to be more spontaneous with your layout. Make sure that your smaller plans are still in proportion otherwise you'll end up in a right pickle when you try to draw it onto your larger plan.

Tuesday, 29 July 2008

Back to work - Measuring level changes in the garden

Okay, party celebrations over. Time to get back to work!

If I remember correctly (and I do because I've just re-read it) then we were discussing your steps and how they change level.

Any level change in your garden needs recording whether it's steps or slopes. Measuring them isn't actually that bad, so there's no need to panic just yet! If the incline is particularly complicated then it may be worthwhile hiring a professional surveyor. If you're willing to give it a go though then well done you.

The key to getting this bit right (and in fact any other bit) is to work methodically and accurately. If you haven't used your assistant up to now, then it may be a good time to ask them to put down their cup of tea and come and help you. There are different methods for measuring levels, but whichever method you choose you must make a record of not only the change in level of a certain distance, but also make a record of the actual distance you are measuring. Plot the points that you are recording on to your survey plan. If you fail to do this and later cannot locate the points then it will have been a complete waste of time and you still won't know your level changes for your plan.

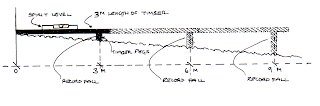
The most common method of measuring level changes is to use a straight piece of timber and a spirit level. You will also need shorter wooden pegs. Aim for your piece of timber to be 3 metres long if you have an average sized garden. Starting at the highest point, place your long piece of timber (i'm going to call it Woody from now on because it will be quicker to type) onto the ground. Support Woody with a wooden peg at the lower end. Sit your spirit level on top of Woody to make sure it's straight. Then, when you're happy that Woody is level, measure the distance from the bottom edge of Woody to the ground. This will tell you what the fall of the land is over a 3 metre period. Needless to say if you can't fit a 3 metre "Woody" equivalent into your space then use a shorter piece, allowing for this in your calculations. You can repeat this procedure over a longer length by moving Woody along each time (see diagram).

If you are unable to obtain a 3 metre piece of timber named Woody (name optional), then you can carry out the same procedure using a 3 metre length of string. This method isopen to more error though as you must remember to keep the string taut at all times.

Another method of measuring changes in ground level is by using optical measuring equipment. This equipment is really useful in much larger gardens and is usually available to buy or hire. As we are looking to save money by designing our gardens ourselves though, I won't go into detail about this method.

Whatever method you eventually opt for you will need to establish a datum point onto your survey plan. The purpose of a datum point is to allow you to have a fixed point that all subsequent measurements can be related back to. Where you decide to position your datum point is not crucial although it would be easier for you if you pick somewhere that is accessible. often the datum point is positioned close to the house or in a piece of ground that is going to remain at the same level when the design is completed.

At a risk of confusing you even more, the datum point, once you have chosen it's position will be known as your 'zero level point'. All recorded heights will then either be higher (+) or lower (-) than your datum point (zero level point).

At your chosen datum point position on the survey write "0:00". If your next level measured is, say, 70cm lower than the datum point, it would be written as "-0:70" or if the level recorded was 30cm higher than the datum point, then you would write "+0:30". Get it?

And that's all there is to it! Easy huh? You can have another cup of tea now and then we'll get the camera out!

Refreshed? Good. This next bit of the site survey is the easiest of all. This is the bit when you can be like David Bailey (or any other photographer you admire) and snap away to your hearts content.

"Why do I need to take photos when I can just look out of the window?"

Photographs provide an excellent record of the site and you can use them to create underlays for any sketches of designs (brilliant if you're not picasso!). The best way to capture the whole garden is to take a composite photograph. This involves you standing in one spot and rotating 360* taking a series of photos that overlap each other. When you have your photos you can piece them together like a jig saw. If you have a posh photo editing programme you may be able to piece together the photos on the computer, and then print out the finished composite photograph. Whichever way you chose, the proportions of the garden will get extremely distorted, and you will need to remember this when you use them as underlays for sketches.

What are you like at drawing? You may find it helpful to draw or sketch a particular scene or feature in the garden that you want to capture. By sketching it you will become more familiar with it as you're having to actually study it, and not just click a camera at it.

Once you've got your photos, have a mess around with them. Enlarge or reduce the images and make photocopies of them. Grab some tracing paper and put it on top of your photos as an overlay. Try sketching new ideas on top of them. They don't have to be masterpieces. It's just an opportunity to start experimenting.

Thursday, 24 July 2008

Knowing how to make your Measurements

Right! Back for the next step already?

We are, you'll be pleased to hear, onto the last stages of recording measurements on-site. Now that you've calculated all of the baseline details you're ready to measure the rest of the garden-hooray! First things first, you'll need to measure the boundaries. At this point it's worth pointing out that your garden, in most cases, will not be square (or rectangular). Even if you have an amazing eye for details and would swear to a court of law that yours is square (or rectangular), it's worthwhile checking these things properly, all the same. Most gardens are an irregular shape - which is really annoying at times! - and it is necessary to get these measurements absolutely correct. Am I repeating myself here? Sorry, but it really is important to measure your garden accurately.

There are a few techniques used in carrying out a site survey. Let's look at two of them in detail.

Triangulation

This technique helps to establish correct angles and is excellent for measuring boundaries. Also, if you have a random tree (or other feature) on-site that you cannot measure from the baseline, then triangulation would work well for this too.

In order to use triangulation, you will need two fixed points that feature on the baseline. In other words, you need to refer to two known measurements from your baseline. It is usually the two corners of the house, but it could be any measurements you want to use. It will be easier to do if they are some distance apart though, as they'll be less cluttered on your rough survey plan. In case I've confused you, your rough survey plan is the bit of reasonable sized paper on your clipboard that you've sketched your baseline measurements on. Once you've established your two fixed points, simply take your second 30- metre tape and measure from each fixed point to the item that needs measuring. In the first instance this will be the top boundary corner of the garden. When you put these two measurements together they will form a triangle and establish the exact position of the boundary corner (or whatever item it is that you're measuring at the time).

Recording this on your rough survey plan, you will find it less confusing at a later date to ensure that you label each fixed point (see diagram below).

In the diagram, you can see that 'point A' and 'point B' are on the baseline and the item being measured, in this case, the boundary corner, is 'point G'. Note the triangle that is created from the two measurements.

Always make sure that the two measurements are taken to the item in the exact same place. If you were to measure a tree, for example, and with one reading you went one side of the trunk, but with the next reading you went to the other side of the trunk, it could be very inaccurate - depending on how old the tree is! You would need to measure in the centre of the trunk, or, do two different triangulation measurements of the tree and later measure its circumference.

If an item that you need to measure is too far away from your baseline's fixed points, then you will need to establish new fixed points closer to the item. This is okay to do so long as you ensure the accuracy of these new fixed points. You can have as many fixed points on-site as you require. Try to keep it as simple as possible though otherwise you'll end up in a right pickle when you come to draw it up later.

Once you have established the boundary corners you can continue to measure the lengths of the boundaries and record the results onto your rough site survey. When you come to create your design, you will need to know who owns each boundary. If you decide to do something spectacular with it and your neighbour owns it, you may end up in all sorts of trouble. Don't forget to write down any information about the boundary itself in your little note pad. Include features such as, what material the boundary is made of, it's height and what condition it's in. If you're looking at a fence, then you'll need to measure each panel and so forth. You will benefit from knowing as much as possible about your garden. Get intimate with it!

You can measure all of the features along your boundary by repeating the same process that you used for the baseline. There may be other features along the boundary that you will also need to record. Flowerbeds, plants, pond or structures may all be present. If you are measuring flowerbeds, you will need to record the position of plants in the bed. This may make your rough site survey too crowded and you may find it easier to complete a seperate sketch for each flowerbed. To measure the plants you will need to start from your boundary and run your measure to the centre of the plants. This is actually an offset measurement, which we'll look at in a moment. For large, spreading plants you will need to record the spread too. It would be helpful if you were able to identify the plants that you're measuring. Don't worry, we'll look at that plant identification later too.

For all internal features on-site you will need to decide whether the triangulation method is the best to use, or whether you would get a better result using the offset technique. Both methods are fine and you will probably have to use both during the survey. So long as, whichever technique you are using, the measurements come from a fixed point.

Offset measurements

These are excellent for determining an irregular shape such as lawn edges, flowerbeds and ponds. You will need to introduce a new baseline that is in a more convenient position. Wherever your new baseline is, be it along a fence or down the middle of the garden, make sure you plot that baseline in relation with other fixed points. Using your steel retractable measuring tape, take measurements from your new baseline at right angles to the feature to be measured. Use aset square if necessary, to ensure excat 90* angles. Take measurements at regular intervals along the feature (see diagram below), allowing closer intervals for more curvier subjects. If you find your baseline is greater than, say, 3 metres from the feature you are trying to measure, it would be advisable to move your baseline closer to avoid inaccuracy.


Try to be as methodical as you can when you measure your garden. When you worked on your original baseline, I encouraged you to measure any features that were close by. If you are certain that you have all measurements required in the area of the first baseline, you can move it and use the tape for new baselines around the garden. Unless you want to use this process as a fitness workout and want to run about all over the place, then you'll find it easier, and faster, to measure an area of your garden just once.

Make sure that you record every feature, whether you plan on getting rid of it or not. If you have a summerhouse, that you intend on getting rid of, but later change your mind, you will already have its dimensions and position to hand. Remember to measure heights and thicknesses of retaining walls. With greenhouses and other buildings don't just measure to the apex of the roof but also to the lowest part of the roof. Remember to observe the way the doors open, their width, any other interesting details that you may find helpful later on. You will need to measure any steps in the garden, including the risers ands depth of each step. Any features, such as lighting or handrails will need to be recorded.

Are you exhausted yet? Don't worry you're nearly finished with this stage, then you can move onto more exciting parts of garden design.

If you have got steps in your garden, then that indicates that you must have a change in levels - don't lie to me now, I'll know! Guess what? You'll need to measure the level changes too. I'll go into that next time. Right now though, I'd say you deserve a nice cup of tea/coffee/other after all that hard work!


Wednesday, 23 July 2008

More Garden Designing Secrets Revealed

So...How did you get on with your baseline?

No problem, right? Good. Now we're up and running with this recording garden measurements thing we can crack on.

As I said yesterday, the next thing that we need to measure are all of the vertical measurements on the house. "Why bother?" I hear you ask( actually I don't hear you at all, but that would be really clever wouldn't it?). The purpose of having a detailed plan of your house face is so that any design you create matches in with architecture and is kept within proportion to the building. Although you may not be aware of it at the time, if you design a feature that is out of proportion to the house then it just won't 'sit' right in the garden and will bug you forever, or until you get so fed up with it, you rip it out and change it.

To record the vertical measurements of the house you need to include everything you can see. It sounds a bit daunting, but actually, once you get going, it's not that bad - honest. Remember to record the dimensions and locations of all windows and doors, windowsills, air bricks, vents, downpipes (carrying water, electric, gas), taps, and also the damp proof course (DPC) level. If you can't see a DPC then it may not be visible or may not even exist - don't worry about it in this case then. You will need to be really detailed with measurements for the doors and windows. Don't just record their dimensions, but also measure the doorframe, jamb, and where the middle point of french doors are located. You will also benefit from noting which way all doors and windows open. On the windows look out for not only the actual size of it but where the glass finishes and the sill begins. You might find on inspection an unusual pattern of glass that you can incorporate into your design at a later date.

In order to record all of this accurately, imagine that your baseline tape is now running up the right-hand side of the house face as you are stood looking at it ( only imagine- don't actually move that baseline tape!). Your original point of origin will still be in the same position. Now, using your steel retractable measuring tape, record from the base of the building up to each feature that doesn't reach the ground (see diagram below). You should already have it's location along the building face from your original baseline measurements but you may find it handy to check. There's inevitably something that gets missed.

You won't need to risk your life to measure the whole height of the building. Nor will you need to run to your neighbour, asking to borrow their ladder (apologies if you, yourself, own a ladder). You can approximate the height of the building by counting the courses of bricks and multiplying them. You will need to measure a brick and one side of the mortar joint to do this!

Before you ask what to do if there is no exposed brick, here's what to do. Simply take a photograph of the house, and using a known measurement, for example a window height, calculate how many times that measurement fits within the height of the building. Any features that are above the ground floor may not be directly relevent to the design of the garden and so there is no need for complete accuracy with these measurements. It is acceptable to guesstimate these measurements.

Whilst making all of these measurements, it is wise to add notes in a separate pad, to record details and observations as you discover them. Note the style of the house, colour of bricks, etc.

If your house has a conservatory or existing extension then you will need to take this into careful consideration before you lay your baseline. You will need to record all the measurements of these additional buildings too - sorry!

Now you should have every measurement required to give you an accurate drawing of the house face. You may also have measurements for existing drain covers, outlines of patios, built-in bbqs, etc. That's all good. These will enable you to make a detailed site survey drawing to scale later on.

A Bit about Scale and how to work to it.

The purpose of a scale is to represent a full sized garden. I would be seriously impressed if you could find a sheet of paper large enough to draw a fully sized plan of your garden but I somehow doubt that that is possible.That is why scale is so useful. You can create an exact replica of your garden just smaller.

Before I get all technical with the scale talk, you may find it handy to have your scale rule close by.

If you require a detailed drawing then it is advisable to use a larger scale (these are the smaller numbers on the scale rule). You will need to be careful with just how large a scale you decide to use though, as the larger the scale, the larger the paper, and that could cause difficulties. A drawing that is produced using a scale of 1:20 is going to be much larger than a scale drawing at 1:100. The size of paper needs to be practical to use. I use A2 or occasionally A3. I find that A4 is just too small. There needs to be room for detailed notes as well as the drawing.

The following scales are usually used for garden design drawings:

A Scale of 1:200 - every unit of your drawn plan represents 200 units on the ground. So if you draw 1cm onto your plan, it will represent 200cms, or 2 metres. This scale is restricted to larger gardens where details are not really required.

A Scale of 1:100 - every unit of your drawn plan represents 100 units on the ground. So if you draw 1cm onto your plan, it will represent 100cms, or 1 metre. If you have a small or medium sized garden then this is the scale for you. You will be able to include a reasonable amount of detail without needing a forest to achieve it (that's a metaphorical forest- you don't have to put one in your garden!).

A Scale of 1:20 - every unit of your drawn plan represents 20 units on the ground. So if you draw 1cm onto your plan, it will represent....yep, you guessed it, 20cm on the ground. This scale is excellent for more detailed drawings, such as construction drawings and very small gardens.

A Scale of 1:50 - is between the two scales above and is commonly used for planting plans and medium gardens.

Have a look at your scale rule. You will see that it includes ( or mine does anyway) scales of up to 1:500, 1:1000, 1:10000, 1:1250. These would all produce tiny drawings, so are generally used for producing maps and plans of extremely large areas. I'm talking country estate size here, so it's best you avoid these sized scales, unless you own a country estate that is!

It is vitally important to draw your plans to scale so that you can eventually have your design created in real life. If some poor person is having to re-jig your design so that it fits into your allocated space, they aren't going to be happy.

Try practising using your scale rule to draw simple objects. Only use your scale rule to make measurements. Do not use it to draw the actual lines. This will ruin the edges of the scale rule and future results will be innaccurate.

Try drawing these rectangles at scales of 1:100 and 1:50:
  • 6m x 12m
  • 3.5m x 5m
  • 16m x 8.5m

Repeat the exercise using these following dimensions:

  • 10cm x 5cm
  • 15cm x 20cm

Now draw them using scales 1:10 and 1:20

Remember to write the scale that you decide to use on the bottom right-hand side of each drawing you produce. That way, when you refer back to it, you won't have to spend ages trying to work out what scale you were working to.

The next part of the site survey to measure, are the boundaries and features within the garden. I'll talk about that later. For now though, have a practice of scale drawing with those rectangles and measure your house facade.

Tuesday, 22 July 2008

Garden Designing made easy (ish)

So... how do you fancy learning something new today?

Have you ever looked over the fence at your neighbours garden and wished that your garden looked as good as theirs? Have you spent hours admiring their water feature, or their planted borders? Do you want to have a poshly designed garden but can't afford the extortionate fees that professional designers charge? ( I sound like an advertisement, sorry!)

I'm going to use this blog to show you some of the techniques that I use to design gardens. As with before, these are only my suggestions and are in no way, shape or form, gospel. There are no set rules for how to design a garden and you may know of a better way. That's fine with me, but you may find a few tips here anyway,that you hadn't thought of.

Okay...are you ready? Let's get started.

Before you even dare to consider what you might like in your garden, you will need to carry out a site survey. This will give you a measured plan of your garden and provide a blank canvas with which to create your masterpieces. It sounds quite boring, and, I'm afraid to say, it is! However, it is the most important part of designing your garden. Get this stage wrong and your designs won't fit causing all sorts of problems later on.

Can't draw? Don't worry, you won't need to be an artist to do this. It's just a matter of doing things in a methodical and logical manner to ensure that you end up with an accurate site survey drawing.

Things you will need:


  • A clipboard and pad

  • Large drawing pad - graph or plain paper

  • Pens and pencils (pencils work better if it's wet, but I recommend only going out when it's dry, just because it's nicer then!))

  • Scale Ruler (I'll go into more detail about scale later on)

  • Beam Compass - allows you to create larger arcs than a normal compass

  • Measuring tapes - should be 2x 30 metres if possible

  • A 10 metres steel retractable tape measure

  • Magnetic Compass (unless your already know your site orientation)

  • Strong bamboo (or anything else) canes, or poles with which to mark out areas

  • One 1 metre spirit level

  • Soil pH testing kit (you can buy disposable kits from any garden centre - I'll talk about soil types later on)

  • Some clean plastic bags and labels for your soil samples

  • A digital camera (you could use a camera that needs film but it is harder)

  • A trowel

  • A pair of secateurs (how overgrown is your garden?)

  • A large ball of string, 20- 35cm wooden pegs and some lengths of timber (this is to measure any differences in ground level)

  • You may like to consider getting yourself an assistant at this point to help with the survey
And that's it, you're ready to go measure that garden. You can of course, use anything else that comes to hand that you might find useful. Old bricks or stones for holding down tapes, etc.

Okay, so the primary purpose of a site survey is to accurately measure the plot. However, it is also at this time that you should make notes of anything that may influence your design. Become a detective in your own who-dunnit mystery and use your sleuthing skills to spot any potential problems. For example, there may be old electric cables running just underground, which if later dug up could prove rather dangerous.

Don't think that you can only measure the plot in one go. If you think, when you come to drawing up your site survey that you've made a mistake, get yourself back out to the garden, and measure it again. Take as much time as you need. As I said before, it's important to get this bit right.

When on-site ( this means you're in your garden but I'm going to refer to it as on-site now as it's quicker for me to type), you will need to make as accurate a record of all features as possible. You will not need to draw your plan to scale at this point. Which is lucky, as if it was pouring down with rain, it could prove tricky to be drawing a scale plan! You will however need to sketch a rough plan of everything you need to measure onto your graph paper (or whatever paper you chose to use). You may find it beneficial to record some of the main features (boundaries and baseline) to scale whilst you're on-site to ensure accuracy when you come to draw up the entire site survey. Your chances of success are greatly improved if you use a sensibly sized piece of paper for your on-site draft - using a small sheet of paper is just going to get too crowded with numbers for you to read it.

A quick lesson on how to use a measuring tape

Sorry if I'm teaching you to suck eggs at this point, but it is important that you get to know your particular tools well. Familiarise yourself with your tape measures (you don't need to be on first name terms with them, knowing what they look like will suffice!). Some tapes are bound by metal ends which unfold to produce the start of the measure. Have a look at yours. It may be that it starts at 3-4 centimetres. If this is the case you need to remember this when you are using it.

When using your tape, make sure that the ends are up close to the position you want to record and that you hold it taut. Do not allow the tape to twist and keep it as low to the ground as possible. Holding a tape high could cause it to sag and you would not get an accurate reading. This could occasionally be unavoidable in the garden setting. For example, you may need to measure through large shrubs. If this situation occurs, don your camouflage paint and army trousers and head into ambush (or should that be "a bush"?). The only way to do this successfully is to get right into the thick of things. Your secateurs may come in handy at this point!

Measuring tape lesson over.

The first thing that you will need to establish on your site survey is the baseline. This is a line between two static points in the garden that you will take all major measurements from. It is usually taken from the line of the side of the house that faces the garden. This is because, with a bit of luck, the person who built your house, built it straight and so should provide accurate results. After this you can then measure the boundary walls, or fences, that come from the baseline. You should try, as much as is possible, to use the baseline to record all significant features. This includes any drain covers, trees, or plants that you wish to keep. At times, it may be necessary to have more than one baseline. If you're lucky enough to have a garden that surrounds your house, then you will need to create a baseline for each side of the house and take subsequent measurements for that side of the garden only. Are you still with me? Or have I lost you completely?

Let's look in detail at how to measure the baseline...

Arm yourself with your first 30 metre tape. Position its end at the left-hand boundary of the house and secure it there. Now run the tape along the edge of the house and to the edge of the garden (boundary) that is in line with your baseline (see diagram a). This is your baseline and will be referred to as the point of origin for all future measurements. Following this, you will need to plot every detail that happens along the baseline. For example, doors, drains, air bricks, etc.

The baseline in this diagram runs along just in front of the house rather than up against it. This is to allow for any protrusions such as doorsteps. Notice that all measurements are written at right angles to the line. This is to prevent numbers muddling into one another and creating chaos when you come to draw them up.

When you measure points along your baseline, you should measure starting from zero. Refer to diagram a again, you will notice that each feature is measured from the same point of origin, in this case, the left-hand boundary. You should never move your baseline, or point of origin as any mistakes made will acculminate and be made worse with subsequent measurements.

If, as is in the case of our made up house in diagram a, your fixed baseline has had to to be laid away from the house wall to allow for protrusions, then you will need to use your steel measuring tape to record where the house face moves in and out.

Once you are satisfied that you have all of the measurements that exist along the baseline, leave the measuring tape where it is, you will need it again.

The next thing to record will be all of the vertical measurements for the house face. I'll discuss that later though. For now, just focus on getting your baseline measurements accurate and we'll go from there.